July 2013
The rear crossbeam supposedly gets assembled in situ, by the
plans, but I decided to make the beam up on my workbench and fit it in one go.
It is a combination of ply with timber inside it. I put a small curve ,side to side, across the
top just for fun. I had to make up a jig for my router to cut the slots in the
deck so the beam could drop into place. Some of the stringer woodwork inside
the upper hulls was also in the way of the beam so I had to rout out a bit on
the edges of the beam here and there. Cutting with the router and a jig is much tidier, but of course cuts could be made by hand, or in some cases, a jigsaw.
As regards the cabin, there are two sizes shown in the plans
depending whether a larger cabin is wanted, or a larger cockpit. I chose the
standard smaller cabin, larger cockpit since I knew I would be mostly using the
boat for day sailing. Even so there is enough room in the cabin to sleep 2 not
to mention the possibility for a boom tent over the 1.8 m long cockpit. I also
think the boat will look more balanced with the smaller cabin.
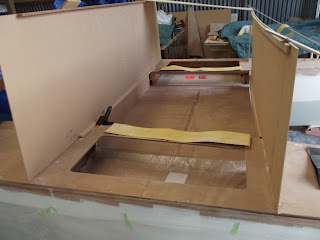
With the 2 large front cabin bulkheads, (the upper parts of BH2 and 3) I decided to make
them as one full panel each, which meant making up patterns from MDF board to avoid expensive errors.
The BH2 and BH3 upper panels are made up full width to match the width that the boat has ended up at, minus the thickness of the cabin outer wall ply each size. They extend through the deck (with a slot) down to the bridgedeck.
The deck had to be slotted with the router much like as per the rear beam. Parts of the bottom edge of these panels have to have rebates where they meet the bridgedeck support stringers, and also at the edges where they go through the deck to allow for the stringers there. Plus the heavy stringers that transverse the base have to have a small rebate at the back of them where they also meet the above mentioned bridgedeck support stringers, similar to with the rear crossbeam. The openings through the front BH2 panel I made about the size per the plans but with a large opening in the centre .
A lot of
the deck of the boat inside the cabin can now be cut away as the bridge deck
becomes the cabin floor. I left a bit of a lip all around the remnants of the deck panel about the width of my jigsaw base against the bulkheads and a bit more on the outer cabin wall edge. It was just easier to keep everything tidy like this as cutting off flush would damage the ply and timber beside it.
With these 2 panels fitted the boat has taken on a very
ungainly appearance, especially from the front view. Let’s hope it improves as
we progress.


Love the detail and the photos you give on this blog. You mention the plans have two cabin sizes. I have just purchased the plans and I don't see two cabins anywhere. Can you let me know on what pages these cabins are shown please?
ReplyDeleteSorry it has been so long. My plans show two cain plans . Maybe Bernd has decided to cancel the long cabin version. But I will have a look at my plans if I can find them, cheers
ReplyDeleteThere were 2 extra pages supplied showing the long cabin version. An extra bulkhead is installed back from bh3, and is called bh3A. If you ask Bernd for them he will send them. Personally I think the big cabin makes the boat look bulky and also it spoils the roomy cockpit. If you want bigger accomodation build a bigger boat like the Eco5 or 6 or the new 520 IMO
ReplyDelete