We have been sailing the Duo 480 Jigsaw for a while now, although not over the southern hemisphere winter.
It has taken a while to get the hang of the biplane rig, but finally we are getting it right. the angle of sheeting , and the angle between the two sails is critical for good performance. Previously we had been getting reasonable speeds on the wind , but not on a reach, but finally, admittedly in a nice breeze, we have been getting good results on a reach, too.
Last season we did not crack 10 knots, and nor did we at the start of this season, but all of a sudden recently we have done 11 and nearly 12 knots, not too bad for a 4.8 metre cruising boat.It is difficult to take photos when you are sailing fast, for us, at least. I hope to invest in some sort of wearable vid cam (Gopro etc) with which it should be possible to get a bit of reasonable footage to show how the boat sails when it is starting to move well.
Thursday, 31 December 2015
Monday, 6 July 2015
Feb 2015
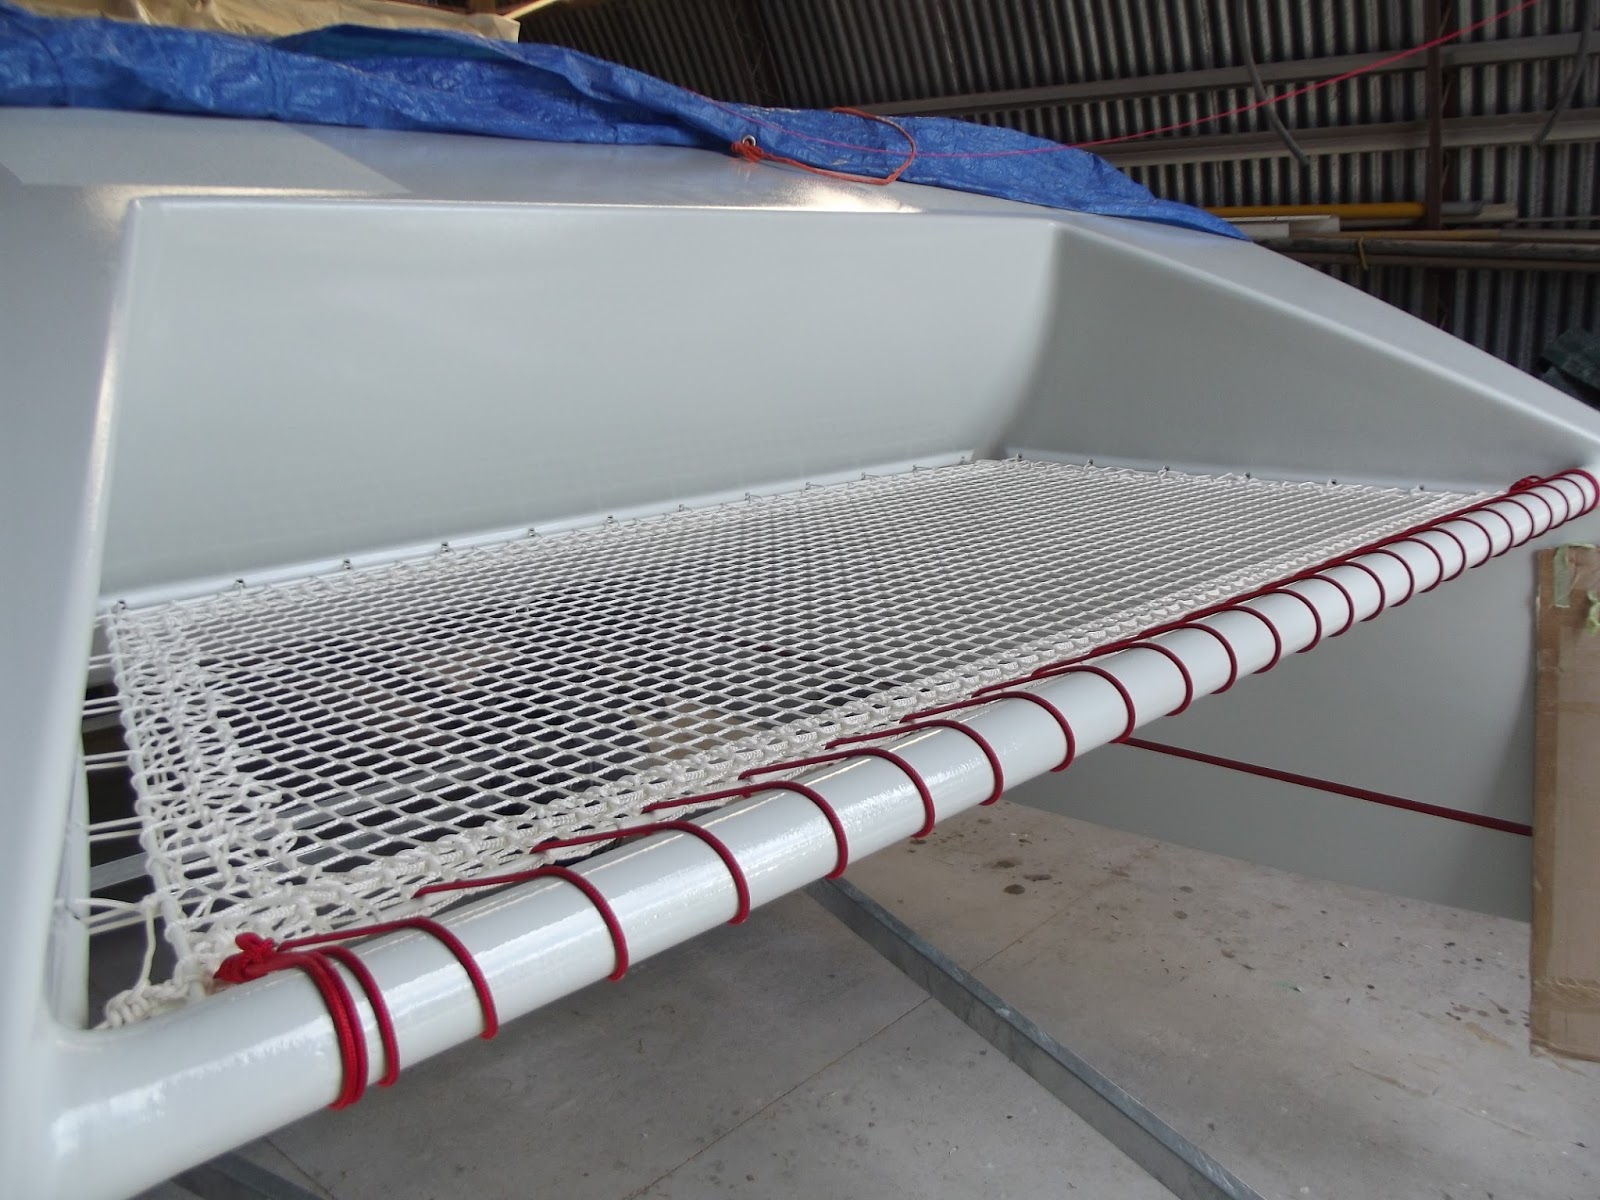
Details of my bow net. I almost was not going to bother with
it but I am glad now I did because without it, it would be impossible to get on
board the boat from the front, even at a beach.
The small tubes mounted on the inner hull
sides , get notched out at about 150 mm spacing, and a fibreglass rod about 4mm
diameter is inserted. The lashing from the bow net goes round the rod, back out
again and onto the next notch and so on. I made the profile of the net myself
by taking a pattern of the bow net space on the boat, minus 50mm all round. After
taking it away from the boat I put small nails round those lines and loosely
stretched out the netting. Then I put 6mm diameter glass rod round the edge line and tied the
netting round that with 2 rows of knotting , all while still stretched on the
pattern. Then I trimmed the excess of with a hot knife . Leaving it all
attached to the pattern boat I took it back up to the boat and with adjustable
saw tables raised it up into position. Then I temporarily attached it with
plastic cable ties, pulled the pattern piece out from underneath, and tied off
the whole thing to the boat as per the photos. I should have taken a photo while
it was still on the frame but forgot.
Testing out the furling and sheeting of the sails on the
grass at home. Everything works. I have subsequently made a mast raising jig
which keeps the mast vertical whilst preparing to lower it into place.
A word about the sails: There are several options for sails
in the plans, depending how technical you want to get, and it is even possible
to use large windsurf sails. In the end I decided to go with the system similar
to that used by Hobie in their Bravo catamaran and AI outriggers. This is one of the options Bernd suggests with the boat.
The long angled battens are 7 mm fibreglass rod and they are flexible enough that they bend round the mast when the sail is furled. The masts turn in the mast holders (see earlier photos of mast base) and the furling and unfurling takes just a few seconds, per side. I also wanted to try a boomless set up and so I had to supply to the sailmaker a lot of measurements of the boat , masts, and various heights and spacings so that the clew of the sails would finish up with an even pull , both downwards and outwards when the sails are sheeted in. Worked out well for up wind sailing but I am experimenting with poling out the leeward sail when reaching to maintain better sail shape.
I made a plywood rear mast holder to go with
the factory built front holder on the trailer, installed an outboard motor
bracket on the boat. I had hoped to avoid having a motor but in the end decided
it was worth having one. The 3.6 hp motor provides more than adequate power and
the tilting bracket puts the prop plenty deep enough.
Launch day (finally) The boat floats well above its water
line till Greg and I hop on both at the stern.( Must go back to the gym soon)
We spend a few hours happily coming to terms with the intricacies of the
biplane rig in light winds, and then sail back to Westpark Marina and pack up
just as easily as the launching itself. I think soon I will be able to manage launching on my own. Of course sailing single handed is easy.
Index of materials (to follow)
Epoxy
Glass cloth
Windows and hatches
paint
masts and spars
sails
sheeting hardware
trailer
December 2014
Non skid applied. I used Hempel system (as well as their
paint on the whole job) . Mask off area desired, apply paint, sprinkle non skid
on , allow to dry, vacuum of anything loose, apply top coat . It seemed to be a
little bit too abrasive at first but once in use I was glad of it and it may
have “mellowed” a bit also. More detail of the rudder system: Not shown is the
2 wraps of shock cord that hold the blade in place yet allow the blade to kick
up if an obstacle is hit. May be visible in later sailing photos. Here though
is visible the flat sections I put on to the blade to keep it straight in the
rudder box. These flats are just filled epoxy which I achieved by masking off
with pvc tape, then double sided foam tape, then more pvc tape. Then fill with
thickened epoxy and jam the whole assembly inside a plastic lined tray which
has the thickness of my rudder box.
Also more paint job photos plus my trailer which was custom
made. I chose not to use rollers on the trailer because of point loading, so
the trailer maker fabricated pivoting mounting brackets to which I added my own
pads (bunks), covered with 2 layers of marine carpet. The boat goes on and off
the pads quite easily, especially with a splash of water onto the pads).
Jan 2015
Close up of the trailer with pads on, boat now on the
trailer (with a little help from my friends).
I should have been
sailing before Christmas but my sails , which were made in San Diego
California, got lost in transit, and did not finally arrive till February 2015.
October 2014
Hatch is finished, cabin top is epoxy primer coated. View of
my masts which are a little more substantial than they appear in the photos
(6.3 m long) ,also the bearing system which are basically nylon sleeves
machined to fit my mast holder tubes, and glued in place on the masts to suit
the base and where the masts exit the cabin top. The mast holders have a base
inside them which I fabricated from some of the composite plate as I used for
my mainsheet attachments (November 2013 photos)
September 2014
Cross section of
rudder blade. The open top and bottom get a wood capping and are shaped
as per the plan drawings and then glassed and faired. Hatch way washboards
epoxy coated.
Rudderbox and tiller assembly. I have gone for
the open back cassette system, and I got my pintles and gudgeons fabricated in
heavy 316 SS to match the thickness of my rudder box
August 2014
Construction of rudder blade, which is basically a tortured
plywood approach with some CF inside (as per the plans). The triangle shaped
pieces sitting inside were just to help hold the shape firm in the jig while
the first stage (gluing the 2 leading
edges together ) was done. I had to modify the jig, which was borrowed from another builder, by putting spacer strips along the upper section to close the jig up a bit. The correct angle is 18 degrees each side- as per photo.
I did a test section
first, and also experimented with the trailing edge. Here I left it square but
when I glassed it I inserted filled epoxy in the gap where the two wet layers
of glass overlap and clamped this whole
trailing edge with pvc tape covered battens. When cured I trimmed it with a
straight edge and fine blade using my handheld circular saw. This worked well
so I used the same approach when I did the real blade, with the result that the
trailing edge of the rudder is quite strong.
Subscribe to:
Posts (Atom)